
Configure NAT – GNS3 Lab
In this article we will demonstrate how to configure NAT using GNS3
Note: If you are not sure about NAT, please read my Network Address Translation NAT Tutorial
To configure static NAT we need to complete these tasks:
* Define the router’s interfaces as inside or outside:
R0uter(config-if)#ip nat inside (or ip nat outside)
* Define static mapping between the inside address and the outside address:
R0uter(config)#ip nat inside source static
+ Static NAT:
To make everything clear, we will configure static NAT in GNS3. Open your GNS3 and build a topology like this:

(IOS used: c2600-bin-mz.123-6f.bin but you can use other versions)
We should use 3 routers in this topology but I want to save some RAM and demonstrate how to ping from the loopback interface so I only use two :) Therefore we should configure the loopback interface of R0 as the source IP address and the fa0/0 interface of R0 as the “outgoing static NAT” address.
R0#configure terminal
R0(config)#int loopback0
R0(config-if)#ip address 10.0.0.1 255.0.0.0
R0(config-if)#ip nat inside
R0(config-if)#int f0/0
R0(config-if)#ip address 200.0.0.1 255.255.255.0
R0(config-if)#no shutdown
R0(config-if)#ip nat outside
R0(config-if)#exit
Finally, we have to tell the router to translate my private IP 10.0.0.1 to public IP 200.0.0.2 so that I can go to the Internet!
R0(config)#ip nat inside source static 10.0.0.1 200.0.0.2
In R1 we just assign the IP address and no shut its interface.
R1#config terminal
R1(config)#int f0/0
R1(config-if)#ip address 200.0.0.10 255.255.255.0
R1(config-if)#no shutdown
Check if all things are right or not:
R0#show ip nat translations
![]()
In this article we don’t use a host attached to R0 so if we want to test our NAT configuration we have to ping from R0′s loopback interface by using the ping extended command:
We can use the extended ping command by typing only “ping” at the privileged mode, specify the “target IP address” and type “y” at the “Extended commands” and specify the “source address or interface” at shown below:
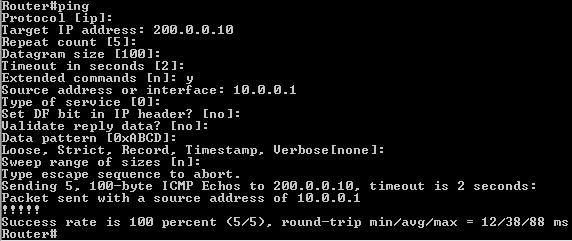
To approve NAT works well we can disable static NAT with the following command
R0(config)#no ip nat inside source static 10.0.0.1 200.0.0.2
Now if we use the extended ping command (without NAT configured):
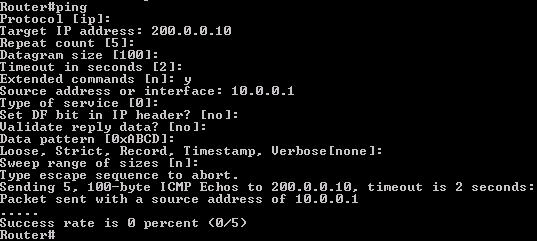
-> We can’t ping from the loopback interface.
Download static NAT configuration: http://www.9tut.com/download/NAT_static_CCNA_self_study.zip
+ Dynamic NAT:
To configure dynamic NAT we need to complete these tasks:
* Define a pool of addresses (public IP) to be used for dynamic NAT allocation
Router(config)#ip nat pool pool_name start_ip end_ip { netmask netmask | prefix-length prefix-length }
* Configure a standard access control list to define what internal traffic will be translated
Router(config)#access-list access-list-number permit source [source-wildcard]
Link the access list to the NAT pool
Router(config)#ip nat inside source list access-list-number pool pool_name
Router(config-if)# ip nat inside (on fa0/0, for example)
Router(config-if)#ip nat outside (on fa0/1, for example)
* Dynamic NAT configuration example:
RouterA(config)# access-list 1 permit 192.168.0.0 0.0.0.255
RouterA(config)# ip nat pool PoolforNAT 200.23.123.6 200.23.123.10 netmask 255.255.255.0
RouterA(config)# ip nat inside source list 1 pool PoolforNAT
Note: In the above command, the word “inside” means “I want to NAT from inside to outside”; “list 1″ means “the source IP addresses to NAT are included in Access-list 1″; “pool PoolforNAT” means “NAT to the IP addresses specified in PoolforNAT”.
RouterA(config)# int loopback0
RouterA(config-if)# ip nat inside
RouterA(config-if)# int fa0/0
RouterA(config-if)# ip nat outside
Configure PAT (NAT Overload)
* Configure a standard access list to define what internal traffic will be translated
* Link the access list to the interface to be used for PAT
* Define interfaces as either inside or outside
PAT router commands
RouterA(config)# access-list 1 permit 192.168.0.0 0.0.0.255
RouterA(config)# ip nat inside source list 1 interface fa0/0 overload
(Notice the “interface fa0/0″ means “NAT out of this interface” and the keyword overload for PAT in the above command)
RouterA(config)# interface fa0/0
RouterA(config-if)# ip nat outside
RouterA(config-if)# interface loopback0
RouterA(config-if)# ip nat inside


Can you please send me the latest dums on this email add: mbmallabo23@gmail.com
thanks in advance.
need an example of configuration of nat overload
this post has just made my day!! it clears all the confusions were there in my head!!
thanks a bunch!!
hi Jeannot!
* here’s an example of Dynamic NAT configuration/overload
RouterA(config)# access-list 1 permit 192.168.0.0 0.0.0.255
RouterA(config)# ip nat pool PoolforNAT 200.23.123.6 200.23.123.10 netmask 255.255.255.0
RouterA(config)# ip nat inside source list 1 pool PoolforNAT overload
then you only have to apply ip nat inside/outside on the interfaces!
that’s itt
cheers ;)
what is a loopback????
hello guys.i want to sit for ccna exam but i dont have a clear notes where i should revise from.any body with clear notes dump to sarapimt@gmail.com. God bless you
Hello everyone! I’m planning on taking my CCNA exam at the end of the month. Can anyone please send me clear notes dump to dhonbo@gmail.com. Thank you in advance!
9tut is the best destination to study..
hello, please how can I open or use those .cfg configuration files please ?
thx
great job explaining NAT/PAT
Hello taking ccna on 4 june 13 can some one send me the current dump to mcfaddei@yahoo.com
very nice thank you
can you assign the outside local (200.23.123.6) in a different subnet with the outgoing interface 0/0 (200.0.0.1)? How would that work?
Thanks a lot. An excellent example for bigginers.
Good explanation,easy to understand.
thank you…………..
Hello taking ccna in end of June, can some one send me the current dump to karimnasa@yahoo.com
HI can u pls send me the latest dumps to rekha.karthickms@gmail.com?
thanks it works… :)
lol why does everyone keep asking for the latest dumps to be sent to their email??
Thanks for the NAT/PAT info
Hi,
can some one send me latest dumps on my email rajahassan76@yahoo.com
thanx a lot for this tutorial. it’s very clear and well elaborated.