
Configuring RIP – GNS3 Lab
In this tutorial we will use RIP version 2 as the routing protocol so that the loopback interface of R0 can communicate with the loopback interface of R2.
A quick summary of RIPv2:
1) Routing Information Protocol (RIP) is a true distance-vector routing protocol
2) RIP permits a hop count of up to 15, so anything that requires 16 hops is deemed unreachable.
3) RIP sends the complete routing table out to all active interfaces every 30 seconds (RIP updates occur every 30 seconds)
4) RIP version 2 does send subnet mask information with the route updates. This is called classless routing.
5) RIP only uses hop count to determine the best way to a remote network (a hop is a router)
6) Administrative Distance is 120
7) Support VLSM & discontiguous networks
Note: If you are not sure about RIP, please read my RIP tutorial first
Below is the topology of this lab

Configuring interfaces for R0, R1 & R2:
R0(config)#interface s0/0
R0(config-if)#ip address 192.168.1.2 255.255.255.0
R0(config-if)#no shutdown
R0(config-if)#interface lo0
R0(config)#ip address 12.0.0.1 255.0.0.0
R1(config)#interface s0/0
R1(config-if)#ip address 192.168.1.1 255.255.255.0
R1(config-if)#no shutdown
R1(config-if)#interface f0/0
R1(config-if)#ip address 192.168.2.1 255.255.255.0
R1(config-if)#no shutdown
R2(config)#interface f0/0
R2(config-if)#ip address 192.168.2.2 255.255.255.0
R2(config-if)#interface lo0
R2(config-if)#ip address 200.200.200.1 255.255.255.0
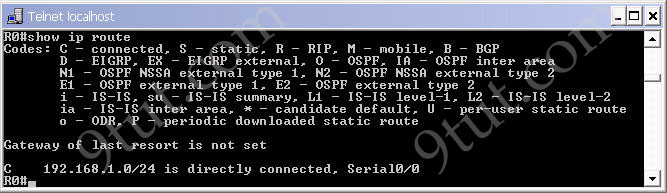
Before enable RIP we should check the routing table on these routers to understand what has been changed in these routers.
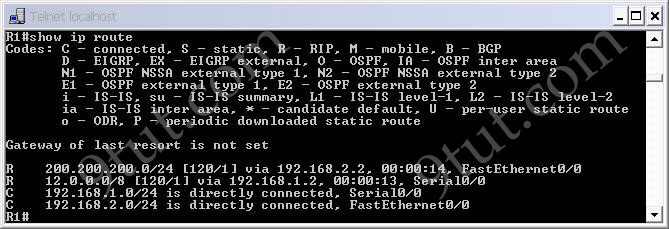
R0
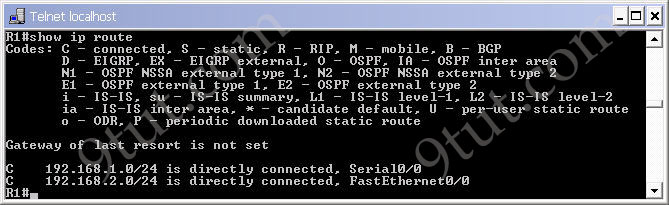
R1
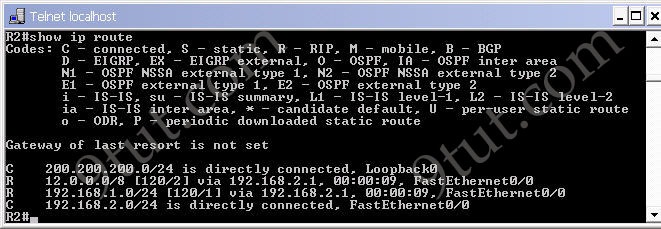
R2
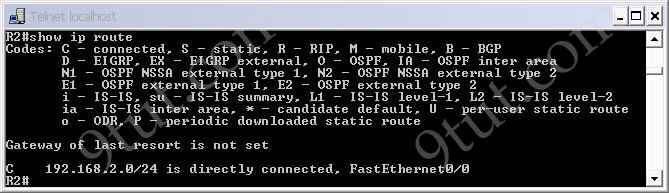
Notice that these 3 routers only see the directly connected routers.
Now if you ping from the loopback (or any interface) of R0 to the loopback (or any interface) of R2 then the it will not successful because R0 doesn’t know which interface it should send the packets out to reach network 200.200.200.0.
Now enable RIPv2 on three routers
R0(config)#router rip
R0(config-router)#version 2
R0(config-router)#network 12.0.0.0
R0(config-router)#network 192.168.1.0
R1(config)#router rip
R1(config-router)#version 2
R1(config-router)#network 192.168.1.0
R1(config-router)#network 192.168.2.0
R2(config)#router rip
R2(config-router)#version 2
R2(config-router)#network 200.200.200.0
R2(config-router)#network 192.168.2.0
Notice that with RIP protocol we just need to type the main network without subnet mask or wildcard mask. If you type a subnetwork, it will be auto summary into the main network.
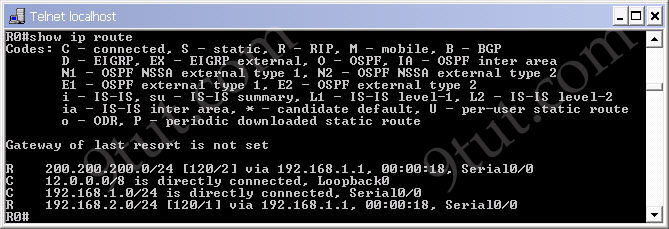
Check the routing tables of these routers we will see the differences
R0
R1
R2
Now we can ping from the R0′s loopback interface to the R2′s loopback interface as the routing table of R0 has a path to R2′s loopback interface and vice versa.
If you want to check what is inside the update packet, use the command debug ip rip.
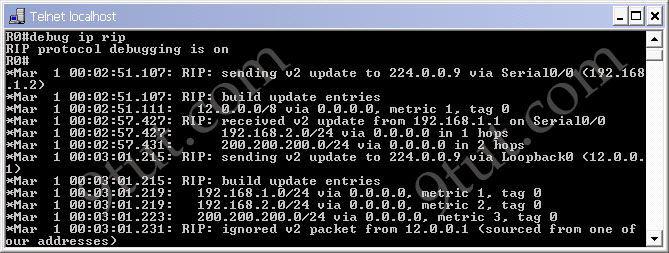
To turn off the debug ip, use the command undebug ip rip. If you want to disable all the debug processes, use the command undebug all.


very nice.
The article is very simple and understanding. And the screenshots help you to understand it better and wont feel boring :)
One question why the Routers R1 and R2 are interconnected using fast ethernet instead of serial interface? and why we are not configuring clock rate on serial interface?
If I add the no-auto summary command in Rip V2 will this be incorrect on the CCNA exam if my Network is in a classful network? It doesn’t seem like it would hurt anything.
If this was a RIP V2 network interface address:
192.168.30.18 255.255.255.240
would I still write the network as: 192.168.30 and the no auto-summary?
Thanks
@jobin: In the tutorial I used both serial and FastEthernet because they don’t affect the configuration. We don’t need to configure clock rate on serial interface because in most modern Cisco routers, clock rate has already been set by default.
@tkay: You only need to use “no auto-summary” command if your network has discontiguous networks. In this tutorial if you add this command there will not have any effect on the network.
If you use the “no auto-summary”, RIP will send the subnet mask as well. But it gets the subnet mask of the outgoing interface so you just need to type 192.168.30.18
Thanks 9tut for your help; please can you explain when we need to use “no auto-summary” and what “Discontiguous network” is ? because I notice no auto-sumarry command is always use in EIGRP.
I have been following this site since last year and I would really love to meet the admins and all those people who have a hand in creating such a wonderful site. This site has been of immense help to many of us… Thanks a lot. As usual like the other articles, this one was also of a great help to me…
Perfectly working !
can anyone comment on GNS3 and Packet Tracer, I am new to both
GNS3 seems more powerful, if i load, say, a c1700 IOS, does it allow me to use other series feature or it is very specific ?
Packet Tracer seem no need to deal with IOS but I am having hard time to make it to work, (using version5.3) like the lab here. I also not able to make the Frame Relay cloud work. (although no problem for all commands)
Any good tutorial on Packet tracer ? thanks
very nice :)
Please let us know some more lab in RIP.
Very nice link .
Thanks & Regards,
Mohammed Wazeer
very helpful and clear!
but still would like to hear the answer to or get a link with answer to Deeone’s question…
good lab… question: when conf router R0, why did you repeat the command? See
R0(config)#router rip
R0(config-router)#version 2
R0(config-router)#network 12.0.0.0
R0(config-router)#network 192.168.1.0
R0(config-router)#network 12.0.0.0
js
If my loopback address is: 10.0.8.1 /24, what shall i type to advertise the network?
will it be:
network 10.0.0.0
no auto-summary
or
network 10.0.8.0
no auto-summary
please clarify if we’ll use the no auto-summary command, we’ll we still type the classful network?
Very useful this Tutorial …Thank You Very Much
very good
very impotant tutorial
@tohrity.. I also agree with you . RIP version 2 is classless routing protocol..after we enter the command no auto summary it displays the truth ….
anyway thanks 9tut you are doing a great job for student like us. cheers
Thank you 9tut I have no word for this website, really its very awesome website.
@tohritz – since we are configuring loopback interface and not any main router network for routing .. there is no need for using no auto summary command, as no auto summary is only used in case of discontiguous network , i.e. when two major sub networks are connected using a another major sub network i.e, say 192.168.1.0/24 is connected in between by 10.0.0.0/24 network.
@tohritz.. but if you are looking for all pinging up the network throughout, i might suggest you to use no auto-summary, dude
very helpfull tutorial……
Hi 9Tut,
can you explain why you didn’t add “passive interface” on loopback interfaces? This will avoid to propagate routing updates on no necessary interfaces (LAN networks) and during debug to avoid: RIP: ignored v2 packet from 12.0.0.1 (sourced from one of our addresses).
Is the split horizon automatically applied?
@Andrew: Yes, in large networks we should not let the loopback interfaces send routing updates. I just don’t want to make this tutorial complex with the “passive-interface” command.
And yes, the split horizon rule is automatically applied.
Amazing :)
very nice.
@9tut
I have followed everything to a tee but r2 cannot ping anyone r1/r0 even though it is receiving the rip updates and showing the connections exactly the same as above. pls help
9TUT: “loopback interface” – I couldn’t understand this concept. Any tutorial on this?
@Aadya: Loopback interface is a logical interface on that router/switch. It opearates in the same way as a physical directly connected interface on that router/switch.
@9tut
Hi, i have one question, it’s so important RIPv2 with Loopback interface configure?
very nice….@9tut…excellent job…
Hi tut,
how we can redistribute in rip ?
with reditribute static route
A pest which is demonstrating up roughly everywhere you go, from film theaters to clothing stores as well as modes of transportation.
celine bag http://www.meldrumhouse.com/Emails/celine bag sale.html
thanks to guide us …useful knowledge ….
thanks i hve don my assgnmnt love u
Very nice articles. it was easy to understand
very good article and easy for understanding
its very helpful
If I use RIP in network then also if I cannot ping from router0 to rourter 2 then what is the reason behind that?????????
very nice lab..
Hello 9tut. Thanks for your devotion. I always appreciate your help.
There is a problem. I use Packet Tracer 5.2.1 to perform “Configuring RIP – GNS3 Lab”
On the PacketTracer Ro – R1 – R2 has a green light (=it means they communicate well each other)
But
When I check “show ip route” on the each Router, the result was as bellow, it is totally different from what I can see above Example. I really wonder what the problems is.
Thanks for your help.
R0#show ip route
C 12.0.0.0/8 is directly connected, Loopback0
R1#show ip route
C 192.168.2.0/24 is directly connected, FastEthernet0/0
R2#show ip route
C 192.168.2.0/24 is directly connected, FastEthernet0/0
C 200.200.200.0/24 is directly connected, Loopback0
@Shawn: From your output we can see RIP was not activated on your interfaces. Please check your IP addresses and RIP network command to make sure the “network” command in RIP covers the IP addresses of your interfaces.
hiii
hiiiii……
I am unable to establish serial connection between R0 and R1 through s0/0. Every other connection is displayed by the command ‘show ip route’ except serial connection between s0/0 of both routers R0 and R1.
Am I making any mistake or do I need to modify configuration of routers?