
EIGRP GNS3 Lab
In this tutorial we will learn how to use EIGRP to run a small network with 5 routers. Below is the topology of this lab
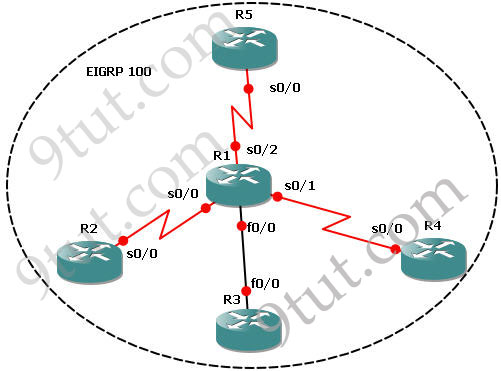
This lab consists of 5 routers and we need to configure EIGRP among them. It is done when we can successfully ping among R2, R3, R4 & R5 and the routing tables of these routers show that they are running EIGRP (with letter “D”).
IOS used in this tutorial: c2600-bin-mz.123-6f.bin (with a minimum of 64 MB RAM) but you can use other IOS.
Note: If you are not sure about EIGRP, please read my EIGRP Routing Protocol tutorial first
IP addresses of routers:
+ R1:
s0/0 – 192.168.30.12/28
s0/1 – 192.168.30.18/28
s0/2 – 192.168.30.35/28
f0/0 – 192.168.60.10/28
+ R2:
s0/0 – 192.168.30.13/28
+ R3:
f0/0 – 192.168.60.13/28
+ R4:
s0/0 – 192.168.30.20/28
+ R5:
s0/0 – 192.168.30.40/28
If you are not sure about EIGRP, please read my article about this routing protocol at http://www.9tut.com/eigrp-routing-protocol
Some important notes about EIGRP:
+ All routers must use the same Autonomous System (AS) number to recognize each other. In this case the chosen AS is 100.
+ The major network in this lab is 192.168.30.0 & 192.168.60.0 so there will be discontiguous networks -> need to use the “no auto-summary” command.
Now let’s begin the lab!
Step 1 – Configuring IP addresses on the routers
*On R1:
R1#config t
R1(config)#int s0/0
R1(config-if)#ip address 192.168.30.12 255.255.255.240
R1(config-if)#no shut
R1(config-if)#int s0/1
R1(config-if)#ip address 192.168.30.18 255.255.255.240
R1(config-if)#no shut
R1(config-if)#int s0/2
R1(config-if)#ip address 192.168.30.35 255.255.255.240
R1(config-if)#no shut
R1(config-if)#int f0/0
R1(config-if)#ip address 192.168.60.10 255.255.255.240
R1(config-if)#no shut
*On R2:
R2#config t
R2(config)#int s0/0
R2(config-if)#ip address 192.168.30.13 255.255.255.240
R2(config-if)#no shut
*On R3:
R3#config t
R3(config)#int f0/0
R3(config-if)#ip address 192.168.60.13 255.255.255.240
R3(config-if)#no shut
*On R4:
R4#config t
R4(config)#int s0/0
R4(config-if)#ip address 192.168.30.20 255.255.255.240
R4(config-if)#no shut
*On R5:
R5#config t
R5(config)#int s0/0
R5(config-if)#ip address 192.168.30.40 255.255.255.240
R5(config-if)#no shut
Now all the interfaces are up. We should check the interfaces on R1 to confirm this with the “show ip int brief” command
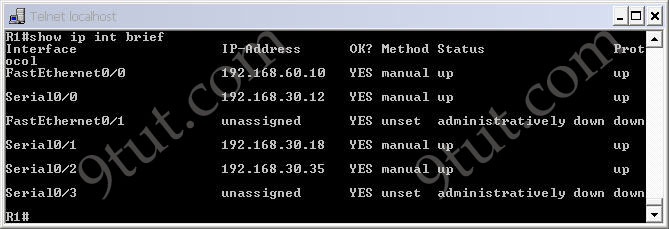
Notice that all both the “Status” and “Protocol” of the connected interfaces were up.
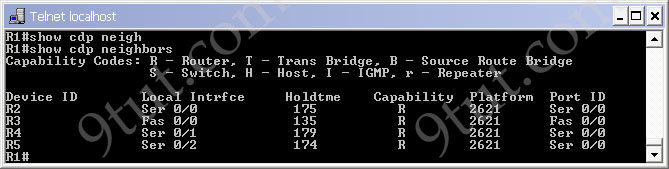
We can see all the neighbors of R1 with the “show cdp neighbors” command on R1:
At this time we can ping between two directly connected interfaces. For example a ping from s0/0 of R1 to s0/0 of R2 (192.168.30.13) will be successful.

but a ping between two far-away interfaces is not successful. For example a ping from R2 to s0/0 of R4 (192.168.30.20) will be unsuccessful.

If we use the “show ip route” on these routers we will only see directly connected link.
Step 2 – Enable EIGRP on all the routers
*On R1
R1(config)#router eigrp 100
R1(config-router)#network 192.168.30.0
R1(config-router)#network 192.168.60.0
R1(config-router)#no auto-summary
*On R2
R2(config)#router eigrp 100
R2(config-router)#network 192.168.30.0
R2(config-router)#no auto-summary
*On R3
R3(config)#router eigrp 100
R3(config-router)#network 192.168.60.0
R3(config-router)#no auto-summary
*On R4
R4(config)#router eigrp 100
R4(config-router)#network 192.168.30.0
R4(config-router)#no auto-summary
*On R5
R5(config)#router eigrp 100
R5(config-router)#network 192.168.30.0
R5(config-router)#no auto-summary
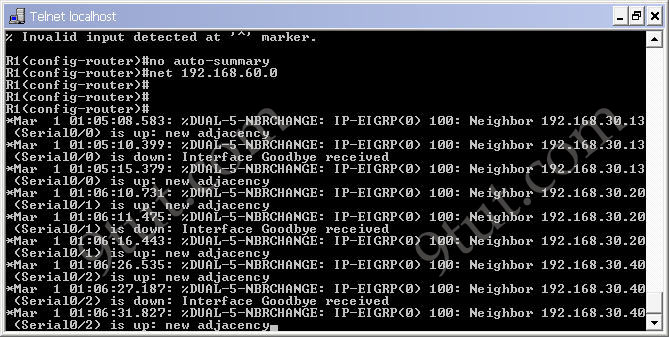
After typing above commands we will see the neighbors adjacency on these routers are up. For example on R1 we will see
Now the EIGRP process is up and we can ping from anywhere. For example a ping from R2 to s0/0 of R4 (192.168.30.20) will be successful now.

By checking the routing table of R2, R3, R4 & R5 we can confirm EIGRP has been implemented successfully. For example, using the “show ip route” command on R5 we see
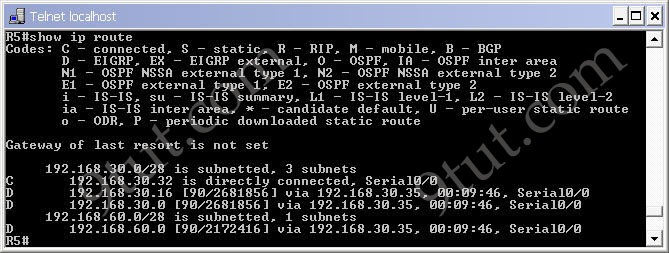
Notice that the routes to 192.168.30.16 & 192.168.60.0 are marked with a letter “D”, meaning it is learned via EIGRP. Maybe you are wondering “why is the letter “D” used for EIGRP, not “E”? Well, the answer is the letter “E” has been “stolen” for EGP – an external routing protocol – but it is not popular nowadays :)
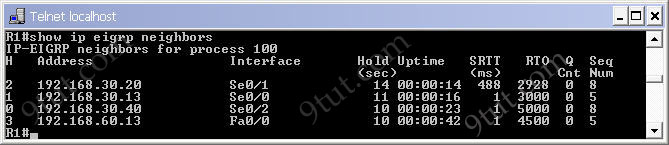
We can check the neighbor relationships on these routers with the “show ip eigrp neighbors” command. Below is an example of R1:
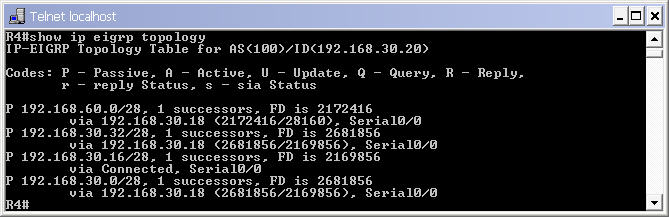
To see the topologies of these routers, use the “show ip eigrp topology” command. Below is the output of R4
Download the configured network
TROUBLESHOOTING part
In this part, we created a faulty network and your task is to find out and fix the errors to make the network run perfectly. You can download the files here: Download faulty network


The report includes a Countrywide Science Basis grant for $325,000 for university scientists in California to create a robotic squirrel to observe how rattlesnakes respond, to study the interaction in between predators and prey.
Hermes Birkin http://www.ecuapa.org/hermesbirkin.html
I am getting the error message
*** Error: 209-unable to start VM instance ‘ghost-c2600-bin-mz.123-6f.bin-localhost.ghost’
When opening the troubleshooting scenario. I have a 2600 image, but it’s not exactly the same; is this causing the error?
I’m happy!!!!
I think it’s no needed to use ” no-autosummary” command because 192.168.30.x and 192.168.60.x are in Class C Calss so they will be summarized as 192.168.30.x and 192.168.60.x and no as 192.168.0.0. I tried whitout no-autossumary in any router and it works!
it works simply because there are not discontiguos network…. the networks pass trought R1 that handles both 192.168.30.x and 192.168.60.x classes
there should be a clock rate configured to router 1? am i right?
Great Lab – Thanks!
Send latest dumps at adnan1.faisal@gmail.com
How do I open the faulty network .cfg file?
I am new to GNS3 … want to ask .. Do I have to add switch image like I did in router case …
can anyone help me, i need to study ccna (803) can anyone help me with latest dumps, or VCE simulator please, my email adres is andersondchikati@gmail.com. many thanks